Quick Guide to Photoshop: 3 Must-Use Tools
Photoshop is seriously filled to the brim with wonderful tools and shortcuts that can make editing our images a breeze, allow us to get more creative with our images, add a little extra magic and sparkle, and make huge fixes that are simply not possible with Lightroom.
But unfortunately, because it can do so much, it’s not exactly easy to learn 😔
That said, there are tools and features that you’ll find yourself using time and time again in Photoshop, so after a while, although it’s still a beast of a program, using it does become so much easier when you have some basics down.
So in this week’s blog post, I’m going to share just 3 must-use tools in Photoshop, especially selected for those that are new to the program, because they are SO simple to use, and because you’ll use them all.the.time.
But before we get stuck in to the meat of this week’s post, I have a brand new, super valuable freebie for you that you are just gonna LOVE if you are looking to get to grips with Photoshop. It’s my Ultimate Photoshop Starter Kit, and it’s got a little bit of everything to get you going, including guides to layers, levels, saving, plus a little clutch of actions GO HERE TO GRAB IT!
Got it? Ok, Then let’s crack on with our three tools that you really must learn in Photoshop.
Levels & Curves
Levels and curves are the “heavyweights” of Photoshop, and you’ll want to get familiar with at least one of these! They both do almost the same thing, so for beginners, I’m just going to keep this simple by telling you just to use Levels for now.
What can you use levels for? All sorts of things! You can use this to brighten the midtones, pull back your highlights and whites, create a matte effect, and add contrast. You can also use this to colour tone your image, so you can see that it is a complete powerhouse when it comes to editing!
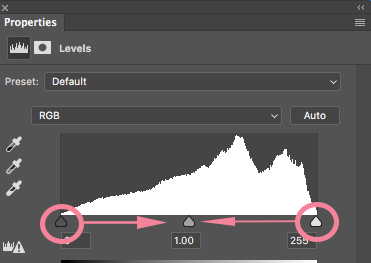
Go to your layers panel, go down to the bottom and click on the create new adjustment layer icon, then choose levels. This is what you will see - a histogram with moveable sliders underneath. The line goes from 0 to 255, and 0 equals absolute black, and 255 equals absolute white, with 1 - 254 being all the shades in between (your midtones).
To keep this super simple for now, let’s use this to adjust exposure, and add a little contrast in one fell swoop. See that middle slider? Move that to the left to lighten the midtones and brighten your image, or move it to the right to darken the midtones, and therefore darken your image.
Now, you’ll see that there are also sliders at either end. Give the slider on the left a teeny tiny pull toward the right, and the slider on the right a small pull toward the left. (so you are bringing those two sliders a smidgen closer together)
BOOM! You just added contrast!
Spot Healing Brush
The spot healing brush is a really quick way to get rid of small imperfections like blemishes, sensor spots, removing telephone lines or stray hairs. It’s basically a blending mode that allows you to take pixels from nearby areas, and then use them to “heal” the offending area.
Go to your toolbar, and then choose the Spot Healing Brush tool.
The beauty of this tool is once you have it selected, all you need to do is click on the area you want to heal, and Photoshop will get to work with all the heavy lifting. So, zoom in or your image, and just start clicking away! In this example below, there are just a couple of stray grains of sand on the skin, but a 20 second bit of work with the mouse is all that’s needed to blend them away.
Have a look at it in action below:
Content Aware Crop
This tool is also deliciously easy to use, so again, ideal for beginners!
Now, I’m sure this has happened to you - you’ve got a horizon line in your image, but when you go to straighten it, your composition gets knocked off, and you’ll end up with some empty pixels. Or perhaps you shot just that little bit too tight in camera, and would love the extend the canvas a little bit.
You can do both of these things really easily with the Content Aware Crop tool.
Let’s take this image as an example, and let’s just say I would have preferred to use the rule of thirds instead of having my subject in the middle.
But when I do that, I’d have to crop further into the image than I would like.
But with the Content Aware crop tool, I can simply get Photoshop to “fill in” the missing pixels (the area that has that checkerboard effect) To do that, once you have chosen the crop tool, go to the top toolbar and simply check the box next to Content Aware. Then go right and ahead and crop your image by clicking on the tick icon.
You can see in the image below that Photoshop filled in the required extra pixels for me! Do note, it’s not always perfect (as in this case) so you may need to use the clone or patch tool too to tidy things up or make them look less uniform.
I could seriously go on and on and on about all the great tools that Photoshop has (and in fact, I did, in my Photoshop Fundamentals and Photoshop Magic courses) so this post really is just scratching the tip of the SNOWFLAKE on the iceberg of what you can do in the program.
Don’t forget, I have a handy new freebie called The Photoshop Starter Kit, where you’ve got some actionable steps to get you started with working with layers, adjustments layers and saving your images for print, plus some free actions! Download that extra special freebie here.


