How to Install Lightroom Classic Presets
Hello there! Today, I'm going to show you how to install Lightroom presets in Lightroom Classic CC.
And the good news is it's never been easier to install Lightroom presets! (Seriously)
In this video, we’ll cover three different ways to do this, depending on whether you have the latest XMP style of presets, or the older, legacy .lrtemplate presets - and whether you just want to install one or two presets or a whole bunch!
Watch the video below to see how it’s done, or if you’re more of a reader, keep on’ scrolling.
Either way, don’t forget to download your free Lightroom Starter Kit (and get your hands on some more free presets!)
Grab your Lightroom Starter Kit!
It's totally free and it's got loads of goodies to help you get started off in the right foot with Lightroom, such as a guide to importing, a step-by-step guide to editing steps, and even some Lightroom presets to get you going! Just go here to grab your free Lightroom Starter Kit.
Prefer to read? Here you go!
There are two different file formats available for Lightroom Presets. There are the XMP file formats - that's the latest, most up to date version. And then you have the older style of Lightroom presets, which use the the .lrtemplate file format.
Now it doesn't matter which you have, you can install both (and I'm going to show you how to install both in this guide) but just have a quick look at the Lightroom presets that you have and just see whether they have XMP at the end, or have .lrtemplate at the end.
How to Install Lightroom Presets with the XMP file format
So the very first, first thing I need you to do is to make sure that you're using the most up to date version of a LIghtroom Classic CC. So if you haven't updated for a while, go and do that now, because this method is only gonna work when you're using the most up to date version of LIghtroom.
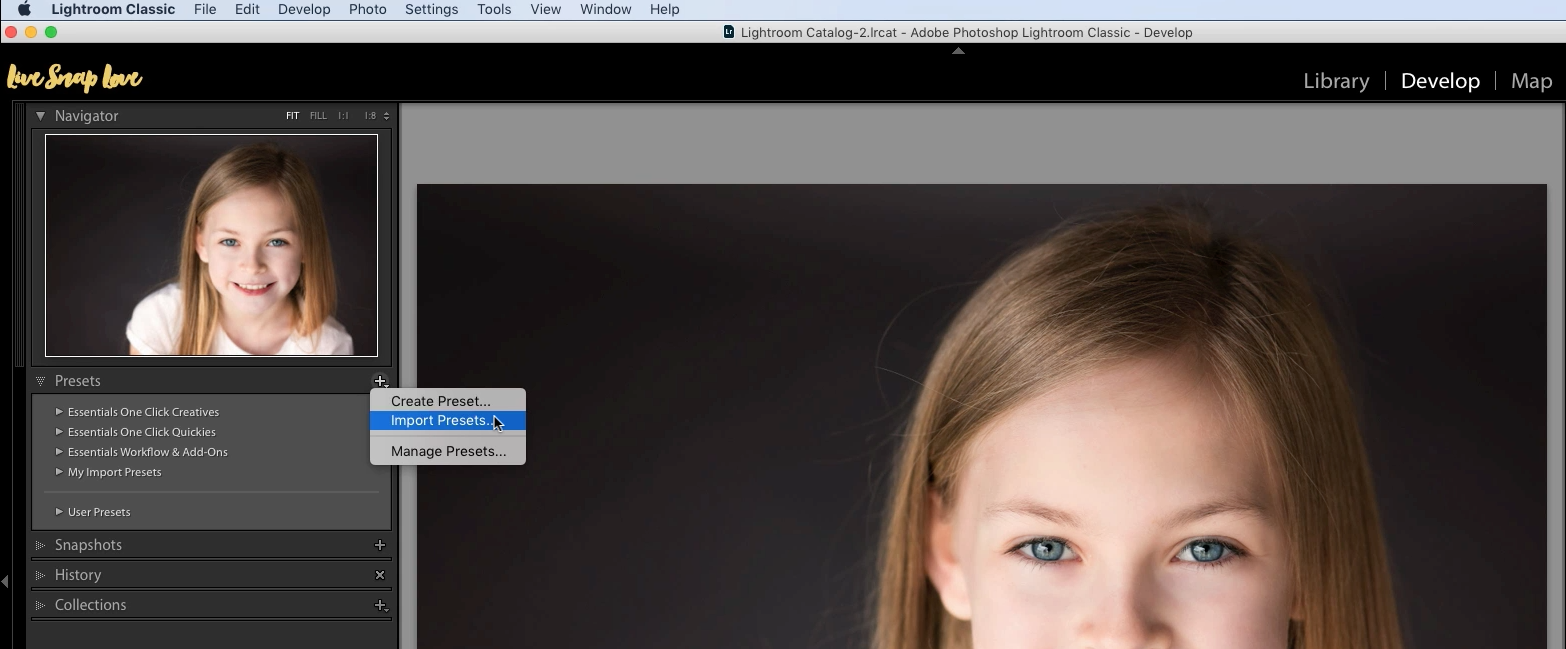
Once you've made sure that you're using the most up to date version and then head into the Develop module and then go over to the panel on the left hand side and just here where it says “Presets”
Now click on that plus icon there on the right hand side and then just choose “Import Presets”.
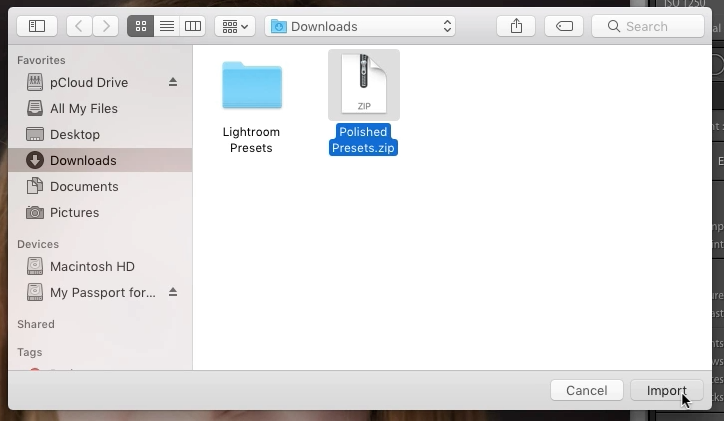
Now your normal windows or Mac file finder is going to open up, and you're just going to navigate to wherever you've downloaded the presets to.
So in my case, that's in my downloads folder, and you can see these presets are in a zip file.
Now the great news is that the latest version of Lightroom, you don't even need to bother extracting the files. So you can just click on that zip folder and then click on import.
And then that little dialog box pops up, does telling us that Lightroom is importing the files and once it’s done, you’ll see that they’re now in Lightroom ready to use.
(Now if you are importing presets that aren't in a zip folder, it's fine, they don't have to be in a zip file. If it's just a normal folder that's fine, just click on that folder and it works in exactly the same way!)
So that's how it works with the XMP file formats. But let's move on to how to install the older legacy format of presets - the .lrtemplate files.
How to Install Lightroom Presets with the .Lrtemplate file format
So there's two ways to install Lightroom presets with this file format, and again, I'll show you how to do both.
But the first thing that I need you to do is extract the files.
Unlike XMP files, you'll definitely need to extract these if they came in a zip file, so do that first.
So if you're on a PC, you could use something like WinRAR. If you use a Mac, all you need to do is DoubleClick and that will extract the files.
This first method that I am going to show you is best if you have presets that are in individual folders.
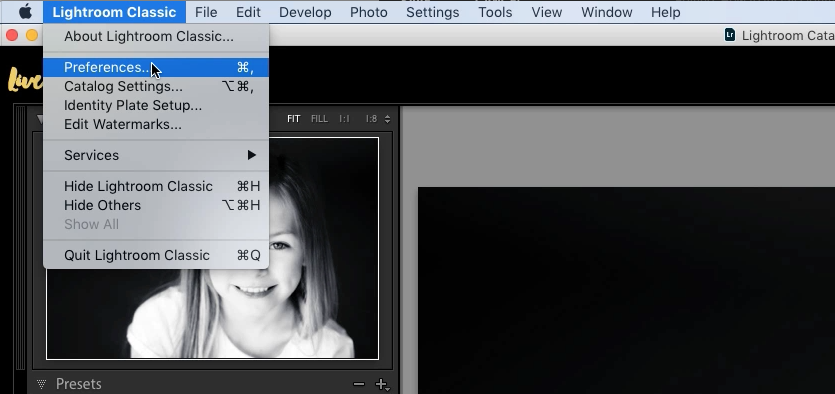
So if you're on a Mac, you're gonna go to the top tool bar, click on “Lightroom Classic” and then “Preferences”
If you're on a PC, it's pretty much the same thing, except you're going to go to “Edit” first and then choose “Preferences”
Same thing, just a different way of getting there :)
So once you've opened up this preferences dialog box on that top tab there, just click where it says Presets from that top toolbar, and then down under location, click on “Show All Other Lightroom Presets”
Then on the “Lightroom” folder, double click on that, and then find the folder “Develop Presets”, then double Click on that to open it up.
And this is where you'll see any presets that you have already installed.
So all you need to do now is navigate to where you save those extracted files. Take the folder of the presets, and simply duplicate it or copy it.
And then just literally just paste that copied folder into the “Develop Presets” folder that we just opened up. Once you’ve pasted the folder, all you need to do is restart Lightroom and the folders will show up once you've restarted.
How to Install Lightroom Presets with the .Lrtemplate file format (2nd method!)
So very quickly, I'm going to show you a second method of installing the LR template presets that is quicker, but it's better if you just have a few presets that you want to install.
So to do it this way, you're going to be in the Develop module again, again in that Presets panel over in the left hand side. Click on that plus icon, click on “import presets” - just like we did back with the XMP files.
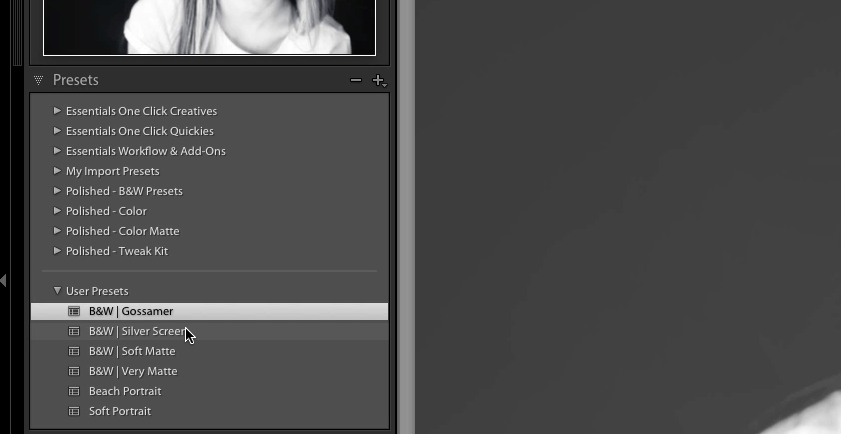
Now just navigate to where you saved the presets, and just manually select individual files. Then click on import and you’re done! They don't show up in individual folders because we haven't imported them the way that we did previously, they'll be there underneath, in “User presets”.
So that's how you install Lightroom presets into Lightroom Classic CC!
Now, if you have any questions or comments, just leave them below , or just let me know how you got on with installing your Lightroom presets!
Don’t forget to download your FREE Lightroom Starter Kit before you go! You'll get free presets in that kit along with a host of other Lightroom goodies, like a guide to importing a step-by-step editing checklist and so much more.


