How to Get Started Using Lightroom Classic - A Beginners Guide
We all know that learning a new piece of software can be daunting - this is especially true when we're talking about Lightroom, which has so many modules, panels, buttons and options that you might not even know where to start!
It has taken me quite a few years to figure out Lightroom, and right at the beginning I really wish I had someone leading me through the process step by step - it would have saved me so much time and allowed me to concentrate on getting good images, rather than having to spend hours and hours sorting out my mess!
To try to help out any new Lightroom users out there, what I want to do today is to give you a step by step guide on how to get started with Lightroom, right from the beginning. We'll cover:
What Lightroom is
How the Lightroom Catalog works
What happens when you first open Lightroom
Importing your first photos from your memory card
Viewing those images in the Library
Taking your images into the Develop Module
Exporting a high quality JPEG for printing
As you can guess, it's not going to be a quick post, so you might want to wait until the kids are in bed before you read this one 😴.
Before we get stuck in, I just want to quickly let you know about the FREE Lightroom Starter Kit that I have for you! In it you’ll get a guide to importing, a step by step editing checklist and an exporting cheat sheet. I’ve even thrown in some free Lightroom Presets too. Hang on, did I mention it’s FREE?! Go here to grab it.
Done that? OK, then let's get started!
What is Lightroom Classic?
Basically, Lightroom Classicis a program that can manage and edit your images, as it is photo editor and image organisational tool all in one! To think of it as just being one or the other is doing it a huge disservice, as the whole beauty and purpose of it is that it allows you to manage, organise, edit and create, from start to finish, all in one program.
Put simply, Lightroom is an end to end photo management tool that has been purposefully designed to meet the needs of photographers. (This is unlike Photoshop, which caters to designers, website creators, cartoonists and so on)
What is the Lightroom Catalog?
Because Lightroom is a management system, it uses something called a catalog to keep track of everything you do to your images. This catalog contains all the information about your image files, including where they are stored, any tags or keywords, along with any editing steps you might take, such as changing white balance or applying color toning.
What is important to note here (and a common source of confusion for new Lightroom users) is that when you import images into Lightroom, you are not actually saving any files within Lightroom itself, but rather simply importing a "reference" to the file into the catalog. Your actual image files will reside wherever you have asked Lightroom to save them to, and LIghtroom will simply keep track of that file - and everything associated with it - in the catalog.
Opening Lightroom for the First Time
When you first open Lightroom, it will ask you to create a catalog. That's because without a catalog, Lightroom can't do very much at all!
At this point, it will give you the option to choose where to store it. For the sake of ease, you could go right ahead and store this in the default location, which will be the Pictures folder of your hard drive, but of course you could choose a new location if you wish.
Once you have went ahead and created a catalog, you will probably get some basic tips and hints from Lightroom (which are not that much use at all, but at least they are something!) and then.....a blank screen like this:
At this point you might be forgiven for wondering what the heck you are meant to do now, but don't worry, it's only empty because you have nothing in your catalog at the moment! So your next step will be to import some images, either from your memory card, or files you have previously uploaded and are sitting on your hard drive.
Importing Photos
In the LIBRARY module, to File > Import Photos and Video to see the import window, or click the import button on the bottom left of the Lightroom window. (It doesn't matter which one you use, both will get you to the import dialogue screen)
The important thing to remember about the import dialogue box is that it works from left to right - so where you are uploading FROM is on the left, and where you are uploading TO is on the right. In the middle is WHAT you are uploading.
So, on the left hand side panel, you need to choose the place where you are going to upload your images FROM. This might be your memory card which is attached to your computer, or your computer's hard drive where you images are stored. For the purposes of this post, we are going to look at adding images from your memory card.
At the top of the middle portion of your screen, you will see some different options. As you are importing new images, select the option that says "copy". Just as you might expect, this copies the pictures over to your computer, and it also adds a reference to the file to the LIghtroom Catalog, so it can keep track of it.
In the middle you will see all the little thumbnails of your images. These should all be checked by default, but if there are any you DON"T want to import, just click on the little checkbox and the checkmark will disappear. (If for any reason they are unchecked and you do want to import them all, you can just click on Check All on the button at the bottom) So, this is you choosing what images to copy over and import.
Finally, on the right you need to select where you want LIghtroom to store your photos. Go down to the bottom section called "Destination". Lightroom will choose a location for you (again usually your pictures folder) as a default location, so if you want them saved somewhere else, you will need to navigate to it here, under the Destination tab.
There are many other options on this right hand side panel, like renaming your files, adding keywords and so on. These are all super useful things, but until you have a system in place like the one we teach you in Get Organized In Lightroom Classic, they are perhaps best left well alone
When you’re happy with everything, simply click the Import button in the lower-right corner of your screen. Lightroom will get to work importing your photos, and you can go and have a cup of coffee, or if it's after 12, wine 😍
Viewing Your Images
Now that you have imported some images, you will see them in the Library module!
Now, there are lots and lots and lots of things you can do here, and you will want to learn them as you go ahead, but for now, we are going to ignore great swathes of it, so that we can concentrate on just the essentials.
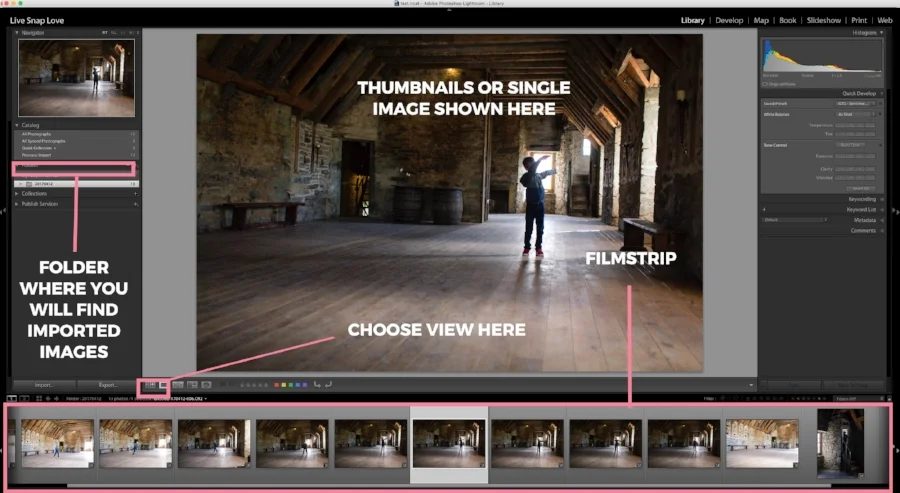
In the panel on the left, called the Navigator Panel, you will see a little panel called Folders, and in there you will see your images. As time goes on and you import more and more images, they will show up here too.
In the middle you will see either a load of small thumbnails, or one big image. You can flip between these viewing the grid of images or just a single image by clicking the buttons on the bottom left of the image: the grid icon gives you thumbnail views, and the single square, as you can probably guess, gives you a single image view. At the very bottom of the screen you will see a row of thumbnail images: this is called your filmstrip.
What I like to do is go to the single image view, and then use the filmstrip to move between each image - as you move through, the big image will change to represent the one you have clicked on in the filmstrip. (You can use your left and right arrow keys to quickly flip along the images) This allows you to evaluate each image as you go along.
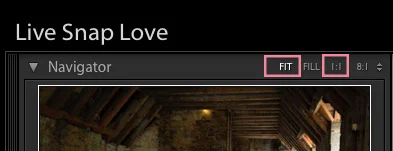
One thing you will probably want to do a lot is check the focus before you decide whether an image is worth editing or not. On the left hand side panel, right at the top, click on where it says 1:1 to zoom into 100%. (Or an even quicker way is just to press Z on your computer keyboard) You can just press Fit at the same place to go back to the normal view once you have finished checking focus, or press Z again.
Now, once you have a workflow system in place you are going to want to tag, rate, sort and keyword your images, but until then, you are best not to do too much. I cannot tell you how much of a mess you can get into if you start randomly assigning colour coding and ratings! (And I speak from bitter experience here)
Getting a workflow in place is something I go over step by step in the Get Organized In Lightroom Classic course so you have one in place before you get too far along - it really doesn't take long to get one set up if you know what you are doing, and it will save you so much time later. Trust me.
Developing Your Images
Once you are ready, you can take your images into the Develop Module. This is where the fun part of actually editing your images happens!
To get to the Develop Module, all you need to do is click on where it says “Develop” along the top-right of your screen and you will go into the next module along. (You will see other modules there, Map, Book, Slideshow, Print and Web. Think of this as working on your image from left to right - you start by organising the LIbrary, then editing, then you go onto use them in a book or a slideshow or print, or share on the web. This is your end to end management in action!)
You will see a screen that looks pretty much like the Library Module, but different. There is no grid view here, so you should just see one of the images in the main screen.
On the panel on the right you will see some panels, called Basic, Tone Curve, HSL / Color / B&W and so on. These are your different editing panels and sections - each one deals with a different area of editing.
Above that you will see a little toolbar, which gives you even more targeted options, and above that, your histogram.
There are so many things you can do here that I could write a whole course about it (oh, wait, I did) but again, let's just stick with some basics to kick you off.
I know that many people using Lightroom for the first time do so with no clue how to edit their photos. I also know that many of you will shoot in both RAW and JPEG, because you are scared to shoot exclusively in RAW because you don't know what do do with the file when editing.
So, what I am going to show you here is a really simple step that gets your RAW file looking like a JPEG without having to do more than click one button.
Go down to the bottom of the right hand side panel and open up the Camera Calibration section. Click on where it says Adobe Standard, and you should see a drop down menu appear, with things like Camera Standard, Camera Landscape and so on.
Clicking on one of these will give your image a quick and dirty edit which gives you that JPEG look. Simply try them out and see which one is best!
After that I suggest you spend a little time in the Basic Panel, starting with setting your own white balance, and then using the exposure slider to set the overall brightness of your image. Then use the highlights and shadows, whites and blacks sliders to set overall contrast, and lighten or darken areas of your image.
Finally, add a little contrast and clarity, and either vibrance or saturation, and you will have a great starting point for any image. Of course, there is waaaaaaay more than you could (and should!) be doing, and we teach you all of that in my Edit Like A Pro in Lightroom Classic program, but it’s a great starting point!
Here is a before and after of two images edited ONLY with the sliders in the basic panel, so you can see what a difference you can make with even this one simple panel. I would go on to do so much more, but you will pretty much ALWAYS make adjustments in this basic panel to get a good base for further edits.
Remember that you can also get a step by step editing checklist in my FREE Lightroom Starter Kit, so be sure to grab that too!
Exporting Your Images
Soooo, once you have finished editing your images you are going to want to share or use them in some way. As I said before, we can create our photo books, collages, slideshows and so on from directly within Lightroom, but if you want to do anything with your image outside of Lightroom, you are going to need to export them.
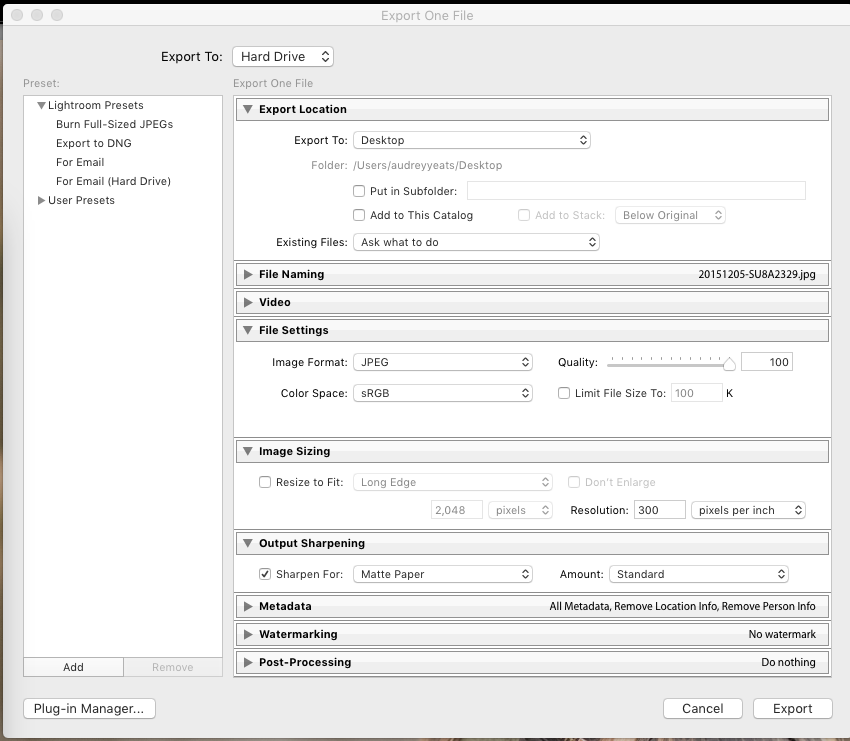
It's super simple - just select the images you want to export, and choose File, then Export. This will bring up another dialogue box with different options. You can choose lots of different settings here, but for now, let's just concentrate of getting a JPEG that we can create prints from.
Where it says Export To at the top change this to Hard Drive, then choose your location under "Export Location". For File Settings change this to JPEG, sRGB and Quality 100. Make sure limit File Size to is NOT checked! Then under Image Sizing, leave the Resize to Fit box unchecked, but under Resolution, type in 300 pixels per inch. You can see the settings in the screen shot below:
Then click Export and your edited image will be available for you to send to your printers for some gorgeous prints.
Moving On
Congratulations! You have just imported your first images, done a little editing to them, and managed to spit them out the other side ready for use.
As you have probably guessed, there is SO MUCH MORE you can do with Lightroom, and you will definitely want to progress from the steps in this tutorial, which let's face it, has only really just gently wiped the surface with a damp cloth.
Lightroom can be really overwhelming to begin with (I had a horrible time with it when I first started!) so don't worry if you don't know how to do anything else right now - remember everything seems difficult before you really dive in! If you have someone walking you through exactly how to use it, and in what order, then it really does become very clear and simple.
That's exactly what I do inside my two Lightroom programs: Get Organized In Lightroom Classic and Edit Like A Pro in Lightroom Classic
Start with our Get Organized In Lightroom Classic which will lay the foundation for working in Lightroom Classic, by getting your folders and images organized so you always know where everything is, a system for maintaining your image files, and steps to help make sure you can find any image again, at any time!
Then move onto Edit Like A Pro in Lightroom Classic which will teach you a full end to end editing workflow that shows you what editing steps to take, and in what order! It will take away all of the guesswork and random slider pulling, and have you editing like a pro in no time.
Just want a little taster before you dive in? Then grab our FREE Lightroom Classic Starter Kit and get a guide to importing, a step by step editing checklist, and an exporting cheat sheet….all for free!


