How to Rate, Delete and Keyword Images in Lightroom
Today, we are talking specifically about how to rate, delete and keyword your images in Lightroom. You'll need to do this to keep on top of your ever expanding library of images, so we are going to dig deep into how you can do this!

Once you have imported your photos, you are going to want to separate the wheat from the chaff by finding your best images, and getting rid of the rest. As usual, Lightroom gives you a wide range of tools to do this.

Assigning Star Ratings
The first way to do it is to give each of your images a star rating, from one to five stars. The fastest way to do this is simply to press the numbers 1 - 5 on your keyboard as you move along your images. (If you want to remove a rating by the way, you just press 0) There are also the star buttons, just click on the number of stars you want to give the image to assign it. This can be useful way to rate your images, since you can sort images from a session into definite keeps, show clients, maybes, what-was-I-thinking, and total rejects.

Picking & Flagging
You can simply flag photos as a Pick or Reject. To mark a photo as a "pick" (your bestest images) you simply hit P on your keyboard when on the image. To mark it is a Reject, you press X.

Flagging By Color
Finally, you could also rate an image using the color labels. You get five colors to use - Red, yellow, green, blue and purple and you could rate your images using these instead of the star rating system. However, many photographers use this as tool to show where an image is in the workflow. For example, red could be those that are still unedited, Yellow could be those needing editing in Photoshop, and Green for the ones that are finished. However you choose to use it, you can simply hit the color on the desktop to assign it, or you can use the 6 - 9 keys on your keyboard (poor purple doesn't get a shortcut!)
A single image can have a star rating, a pick rating, and a color rating! How much you want to do really depends on your workflow, and how many images and/or clients you work with.

Deleting Images
I delete anything that is a technical fail (such as out of focus images) and also anything that I simply will not use at any point - I see no point in these taking up valuable space in my computer. However, if you have clients, you may wish to keep ALL images from a shoot regardless of quality. Either way, you will probably want to delete images at some point!
You can either:
- Simply press Delete on your Keyboard
- Right Click and choose Remove Photo
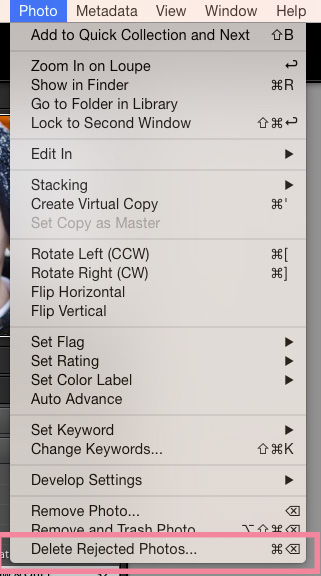
- Go to the Photo Menu and Select Delete
Lightroom will ask you if you want to delete the only the reference to the file in Lightroom, or if you also want to physically delete the file from your hard drive. Personally, I always choose to delete from disk - otherwise your Lightroom catalog and physical files don't match, and I'm just too OCD to do that! Plus, what's the point of having an image that you won't use, see or even remember exists? So, I recommend clicking Delete from Disk, but hit remove if you want to keep the file, but just not see it in your Lightroom catalog anymore.

The fastest way to delete a group of images is to hit X to mark it as reject, then go to Photo and then choose Delete Rejected Photos. All the photos marked as a reject will be gone at the same time! However, you could also filter by type (say to only show images rated with 1 star) and then select all, and delete using the above methods.
Adding Keywords
Adding keywords is the key to being able to quickly find images in your library. You can search and filter your images to find those that have a specific keyword - such as "beach" - and all your images you have added that keyword to will pop up!
Your keywording tool is on the right hand side of the Library Module. To add keywords to an image, select the image and type in the keywords to the Keyword Tags section you will see in the Keywording panel. Add the keywords and press the enter key. You can add more than one keyword at a time, just by separating them with a comma.

That's it for this tutorial - I hope you enjoyed it! Before you go, remember to download your free Lightroom Starter Kit - you'll get an import guide, an editing checklist, and export cheat sheet and three presets!