How to Bring your Photo Books to life with Video!
One of the things I have done differently this year to my family photo books was to add video to them! This is such a fun little addition - hearing voices and sounds along with the photographs really helps bring some of them to life, especially videos of things like school performances or dancing, but even just hearing how voices sound adds that little bit extra!

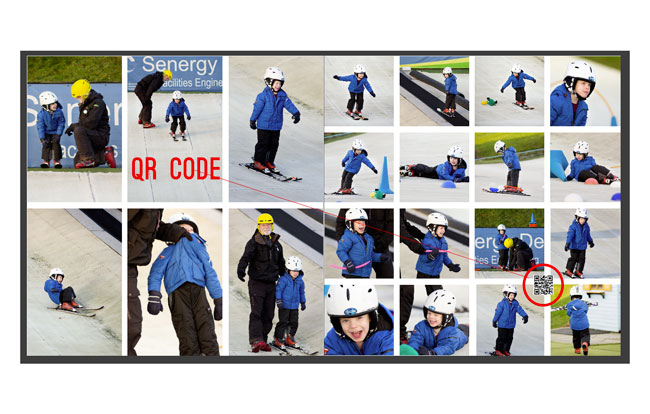
To do this, I used QR codes and added these to the photo book as images. If you are not sure what a QR code is, I bet you have seen loads of them already. It's the small black and white box you see on the image below - you scan them using your iPhone or iPad, and that takes you to the linked content on the web. In the case of the photo books, this takes you to a video!
If you are interested, here's a step by step guide to how to do it:
1) Upload your videos to a online site such as You Tube or Vimeo. I use Vimeo for my private videos.
2) If you wish, create a password for viewing. This means that your files will be private and no-one else can view them if they don't have the password. I created passwords for every video and personally I would recommend that, although you can always add passwords at a later date if you are not sure.
3) Copy the URL of the video that you want to embed in your photo book. (Just click on the share button on your video and it will give you a URL to copy)
4) Go to a site that creates QR codes. I used a Kawya which is a free service, and it worked brilliantly.

5) In the box that says URL, paste in the URL of your video. If you want to pay for QR codes, click Dynamic. If you want them all to be free, click Static (there's an explanation of the difference between the two on their site, I'll leave you to read it there if you are interested, but basically you can change the URL destination of a Dynamic code, but Static, is well, static - you can't change it later) I love free, so I used Static.
6) Click Generate and the box on the right will pop up with a QR code like in the image above. Save the QR code image to your computer as a PNG..
7) To make sure that you don't get confused about which QR code goes with which video, make sure that you rename both the video file and the QR code file to the SAME NAME. Yep, I'm writing that in capitals after I didn't do that, and had to re-do some of the codes….
Once you have all your videos uploaded and your QR codes generated, it's time to add them to your photo books! Simply add the codes as you would an image, but bear in mind these don't need to be very big at all, so don't assign them too much space! A small one inch square is more than big enough - and in fact you could go even smaller. I use Blurb, so I did my books as normal, then just amended the pages to add a little image box, which would take my QR code.
I primarily wanted the book to be about the photos it so I only added in around 8 videos or so (in a 240 page book) and made sure to make the codes themselves small and unobtrusive enough so that if they didn't work - now or in the future - it didn't detract from the images in the pages at all. (I'm sure there will come a day when QR codes are old hat and they won't be accessible in the way they are now so I'm future proofing :0))
(For you scrapbookers / project life'ers out there - it might also be a nice touch to add these to your scrapbooks - you could just print out the QR codes at home and slot them into your layout pages?)
When you get your books back and you want to view your videos, simply scan in the QR codes using the app in your iPhone (or iPad) and it will bring up your video! Ta da!