Why Your Photos Are Always Too Dark (And How to Fix It)
Do your photos keep coming out too dark?
Are you playing around with the settings, but your photos never quite seem to look like the light, bright, perfectly exposed image you hoped for?!
Does there seem to be plenty of light, but then you snap your picture and it’s too dark?!! 😱
Then this my friend, is the blog post for you!
Today, we’re going to at four things:
The main culprit for images that are too dark
What can go wrong with shooting in AUTO or the semi automatic modes
How to brighten an image that is too dark when using AUTO or a semi automatic mode
How to adjust your image brightness when shooting in manual mode!
Ready? Let’s dive in:

The Reason Your Photos Might Be Too Dark
When we talk about images being too dark or too bright, we are really talking about the image exposure.
Exposure simply means how long the camera sensor is “exposed” to the light. So if your photo is:
Too dark (underexposed) → there is not enough light is hitting your camera sensor
Too bright (overexposed) → there is too much light is hitting your sensor
Your exposure is controlled by just three ickle (but massively important!) settings:
Aperture
Shutter Speed
ISO
Now, getting the right exposure is basically the skill of balancing those three elements to make sure that you get the photo to look the way you want it to, AND, at the same time, making sure that the scene is correctly exposed - in other words, not too dark or too bright. (Instead it’s juuuuuust right)
This can be tricky when you are new to photography, because you probably don’t know which settings to use to get the look you want, so you either rely on the camera to do it for you (or use a cheat sheet which gives a similar result!) then on top of all that you have the stress of balancing the exposure too!
This double whammy is why many new photographers will either stick to using AUTO, or one of the semi automatic modes like aperture or shutter priority, so that the balance of exposure is up to the camera, leaving them at least one less thing to worry about.
Which - rather unfortunately - often results in images that are too dark or too bright.
(If you are shooting in manual mode, it’s slightly different - but we’ll get to that in a minute!)

The problem with AUTO or the semi automatic modes:
When shooting in AUTO, the camera decides on the Aperture, Shutter Speed and ISO settings for you, and it tries to balance the exposure as best it can.
The problem with shooting in AUTO is two-fold - first of all, your camera has absolutely NO frickin’ idea what you want the scene to look like, so it goes for middle of the road settings to try to cover as many eventualities as possible, crosses it’s fingers, and hopes for the best.
And as I’ve said again and again, what does middle of the road settings give you?! Middle of the road photos!
So that’s one reason to avoid AUTO mode…but it’s not the only one.
The second reason you want to avoid it is because it doesn’t know what’s important in the frame, it will always try to “even out” the exposure, often making the image darker overall than it needs to be! (sometimes brighter, but most times, darker)
But what about if you are shooting on one of the semi automatic modes? Surely that must be better!
Yes….and no 😊
If you are shooting on one of the semi-automatic modes rather than AUTO, the reason your photo looks too dark or bright is really the same - you’ve left it up to the camera to decide on the correct exposure.
Sure, you are giving the camera MORE information by telling it what aperture or shutter speed to use, but whenever you leave that final balance of exposure up to the camera it will frequently get it wrong, giving you images that are too bright or too dark.
The solution? Use Exposure Compensation!
So, as we know, when shooting in AUTO - or one of the semi automatic modes - the camera is deciding the exposure.
If it’s wrong - in other words our image is too dark or too bright - we simply need to tell the camera it’s messed up, overrule it, and make the image darker or brighter ourselves. (The old “If you want something done right, do it yourself” adage)
To do this, we use something called Exposure Compensation.
With exposure compensation, we are basically telling our camera to either add exposure (make it brighter) or take it away (make it darker)
The camera is still balancing out the three elements of exposure for you, but it does so to where YOU set it to, instead of where it thinks it’s the right exposure.
When you look at the screen on the back of your camera or through the viewfinder, you will see an meter that looks something like this:
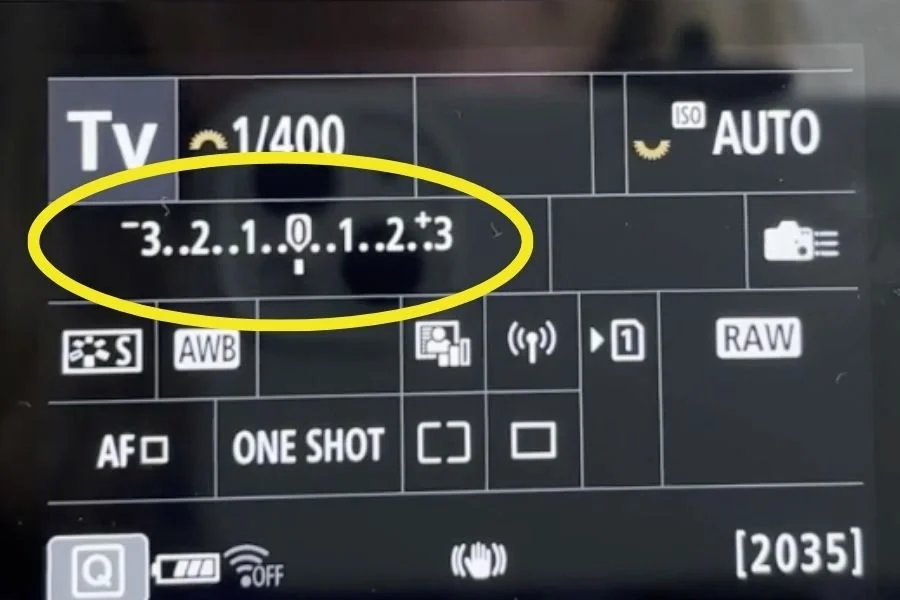
For those of you that don't know, the numbers indicate the exposure in stops, and the little bar shows where you are currently exposing to.
When you use AUTO or a semi automatic mode like Aperture Priority Mode, the camera tries to get the little bar into the middle (at 0) for what it thinks is a "balanced" exposure.
However, the majority of the time we probably don't want our little bar to be in the middle, we want to over or under expose from what our meter is telling us so that our subject is correctly exposed.
This is when we would use exposure compensation!
So here’s how we fix it:
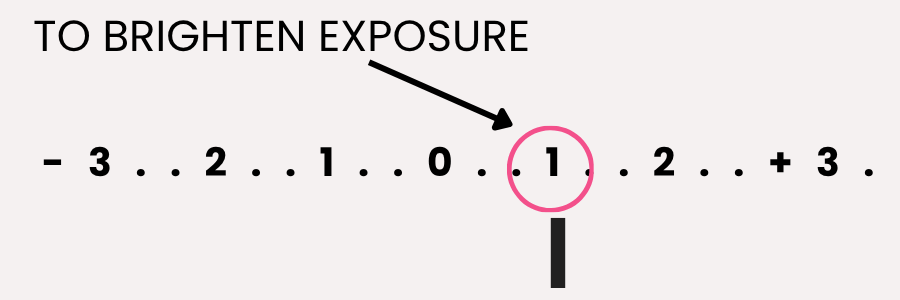
If Your Photos Are Too Dark (Underexposed)
If your image is UNDEREXPOSED - in other words it’s too dark - you can set your camera to add MORE exposure.
You do this by selecting exposure compensation, and using the dial on your camera to move the little bar over to the + side.
How much depends on how dark your image is - in some cases, just moving the little line to between 0 and 1 is enough! For others, you might need to be at +2 - it all depends on the image and the light.
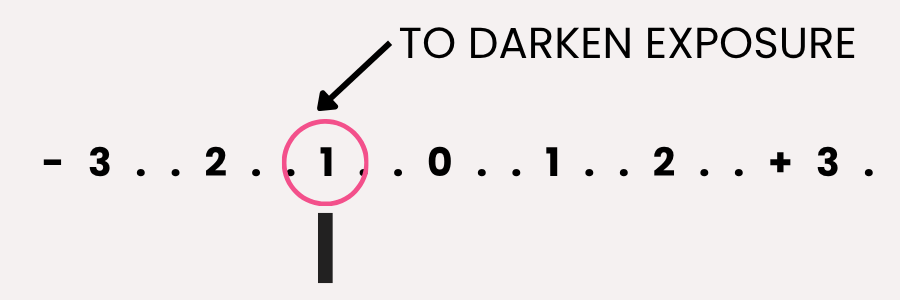
If Your Photos Are Too Bright (Overexposed)
Then you are going to do the opposite - you are going to want that little bar to get into the - side.
So again, you’ll select exposure compensation and move the dial so that the ticker moves into the - side.
Again, the actual number will vary, so until you start shooting in manual mode and metering yourself, you’ll have to do a bit of guesswork.
So using Exposure Compensation is pretty simple, but naturally, there’s a downside 😉
The camera is going to decide which settings to change in order to let more or less light into the camera, and it might not be what you want it to do!
Also, whenever you move, or your subject moves, the camera will keep metering, and therefore keep changing the exposure (even though the light itself hasn’t changed)
Which is why I strongly recommend doing two things:
1) Truly learn each camera setting and what it does, and how to quickly choose the right one for the scene. (This is something we cover in depth in our Exposure Essentials course. Just sayin’!)
2) Learn how to shoot in manual mode so that you can choose the right exposure yourself! This is the final goal of Exposure Essentials course- getting you to choose all three settings yourself.
What if I already shoot in manual mode?
If you are shooting in manual mode, then the final balance of exposure is up to you, not the camera! (Can’t blame the tools for this one!)
This means you need to adjust your camera settings to let in more or less light.
If your image is too dark (in other words underexposed) try:
Opening up your aperture (lower F number)
Slowing down your shutter speed
Using a higher ISO number.
If your image is too bright (in other words overexposed) do the opposite!
Close up your aperture (higher F number)
Use a faster shutter speed,
Use a lower ISO number.
You can adjust just one, or a combination of these three settings based on what you want the scene to look like and the light on the scene.
(Want to get better at getting the right exposure in Manual Mode? Check out Manual Mode Magic!)
Final Thoughts
If your photos are too dark or too bright, it’s really just due to you not understanding your camera settings, and more importantly, not taking enough control!
Because regardless of how expensive that camera is, and how many promises it made on the box, it is nothing more than a bunch of wires and sensors that cannot see or react to a scene in the way that YOU can.
Which means if you want to get your images to look more polished, more professional - and more importantly, match what you see in your head - you need to tell the camera what to do!
In fact, the MORE information you can give your camera, the better the final results will be.
If you’re tired of second-guessing every thing, do make sure to check out Exposure Essentials. In just a couple of hours you’ll have all the information you need to take control of your camera settings, get more creative images immediately, and start to make your images look the way you want them to!