
Why are my photos grainy (and how do I fix it?)
Ever wondered: Why are my photos grainy?! Then you are definitely not alone!
One of the biggest problems I hear from new photographers is that they are struggling to understand why their photos are so grainy - and what they can do about it 😉
I totally get how frustrating it is, believe me!
Back when I was using my Canon Rebel, a lot of the time my photos would look grainy, and simply wouldn’t have that same sharpness that I could see from other photographers, which to put it mildly, is freaking annoying.
So that’s the problem we’re going to address today - why your photos are grainy, and most importantly, what you can do to avoid or fix the problem!
AND I’ve even got a free camera settings cheat sheet to help you :)
You can watch the video (highly recommended) but if you’re short of time, feel free to scroll down for the quick read version. Either way, enjoy…
What is grain?
Let’s start riiiiight at the beginning with what grain is. Grain is also called noise - it’s that grainy, speckly stuff you see over your photos, usually worse when it’s low light photo. Here’s an example of a photo with grain, zoomed in to a section so you can see the grain more clearly.

What causes grainy photos?
The culprit is your ISO setting.
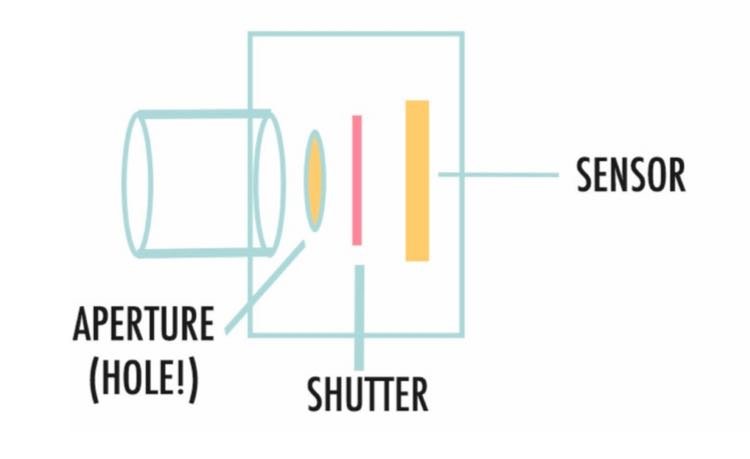
A quick recap on ISO for those of you who might not be familiar with it: ISO is simply our camera’s sensitivity to light. So, you let light into your camera via your aperture and shutter speed, and this is picked up by your sensor. The higher the ISO number, the more sensitive the sensor is to light.
When we’re shooting in low light, we generally have to compensate for the lack of light by bumping up our ISO setting.
This is fantastic as it allows us to shoot without resorting to the dreaded pop up flash, but the problem is that these high ISO's numbers can introduce noise to your images!
So….how can I make sure my photo isn’t grainy?
The most obvious answer is to use as low an ISO number as possible. Try letting more light in via your aperture or your shutter speed to allow you to move the ISO setting down.
Getting your settings right here can have a HUGE difference on the amount of noise you get, so it’s worth understanding which settings to use.
To help you with this, take a look at this blog post, How to Choose Your Settings in Manual Mode to learn more, or download the cheat sheet below.

The other thing you can do that will help is to physically get more light onto your subject - get your subject in front of the window and open up the blinds or curtains, for example. Again, this should help you keep that ISO number down as low as possible.
In the image below, the subject is pretty much next to the window, allowing me to use a lower ISO that if they had been further back into the shadows.
(A good tip here is to make sure your subject has nice bright catchlights, if they do, they’re probably in the right place! Click here to learn how to do that!)

I use quite low ISO numbers but still get grainy photos! What gives?
If you are using a relatively low ISO number, but still seeing grain in your photos, it’s highly probable that you aren’t getting your exposure correct in camera.
Under-exposing in camera is the BIGGEST reason for having excessive noise in your photos, even at relatively low ISO numbers.
Noise lurks in the shadows, so when you raise the exposure in processing, you actually make the noise more visible throughout your image.
That means a photo taken with a lower ISO and underexposed will have MORE grain than an image taken with a higher ISO, but correctly (or even over) exposed.
Let me show you an example. These images were taken with the same aperture and shutter speed, but where I've changed the ISO to get different exposures. In the first one I've underexposed in camera, but brought it up to the correct exposure in Lightroom. The second was exposed correctly in camera and the third was slightly over-exposed, again, this was fixed in Lightroom.
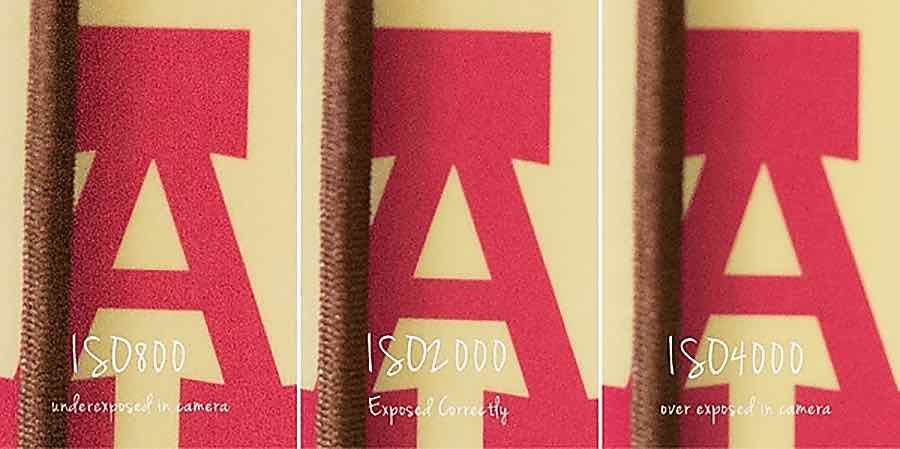
I appreciate it’s difficult to see when sized for the web, but hopefully you can make out that the underexposed image has the most amount of noise after we’ve brought up the exposure in processing. The one with the least amount of grain is the one that was overexposed a little!
The moral of the story is: don't be scared of ramping up the ISO to get the exposure right. It’s MUCH better to have a higher ISO number and correctly expose, than use a lower ISO number and underexpose.
One little side note here - it can be difficult to get exposure right when shooting in any of the semi automatic modes because the camera is constantly adjusting exposure, so the absolute BEST thing you can do is learn how to shoot in manual mode!
And, you guessed it….you can make a start today by downloading that cheat sheet I mentioned! Grab it here..
I’ll wait.
How can I fix my grainy photos?
Despite your best efforts, you will obviously still get some grain in your photos from time to time, but panic not, as you can fix this in Lightroom.
Go to the Develop Module, and choose the Details tab from the panel on the right.
You have two options here - you can use the DeNoise feature (amazing) or do it manually.
To use the DeNoise feature, simply choose the strength (i.e how much noise reduction should be applied) and click the button! It takes a minute or two so I tend to only do this on images that have a high amount of noise.
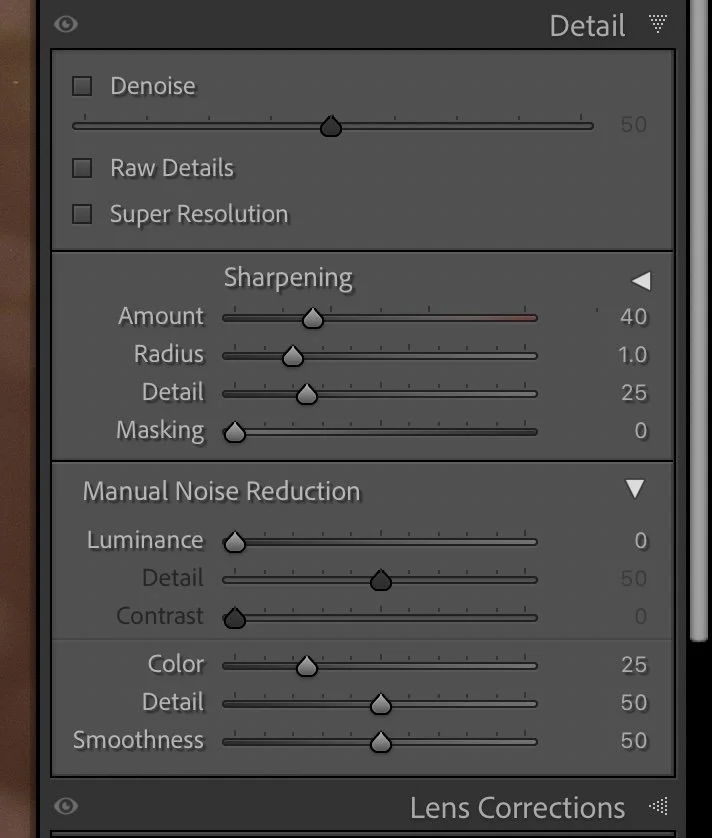
Another (quicker) way is to go down to the Manual Noise Reduction section, grab the luminance slider, and move it to the right. (Be sure to zoom in so you can see how this is affecting your photo)
You can also use the detail and contrast sliders to help fine-tune the noise reduction (moving the color slider is useful for getting rid of color noise too!)
Just a word of warning - go too far and your image will look too smoothed out and fake, so it can be better to leave a little noise in than go to far and have your subject looking like a plastic doll.
And there you have it!
What grain is, what causes it, and how to fix it.
Not bad for one little blog post! Be sure to scroll back up the post and look at the linked blog posts to get even more info.
As always, if you liked this blog post or picked up a handy hint or two from it, I’d be super grateful if you could share it around.
Pin it to your boards on Pinterest, or share on Facebook or Twitter, or just link to the blog in general. Many thanks if you do!