The Ultimate Guide to Lightroom Presets (+ Free Presets!)

Editing an image is SUCH an important part of the photography process, but if you are anything like me, you really don't have a lot of time to spend at your computer playing with your photos.
Although using Lightroom is relatively quick and easy, there is a way you can save even MORE time is by using helpers such as presets!
A preset is simply an edit that has been "recorded" so that you can apply the same steps to any image you wish, with just one click of your mouse. This can save you a lot of time processing your images, as all you need to do is click on the preset and leave Lightroom to to do rest of the work moving all the sliders for you.
Kinda like having an editing servant 😄
Sound good? It is!
That's why I'm going to go over everything you need to know about presets so you can put these to work for you and try to claw a little bit of time back into your life.
If you already know you want to get your hands on my free lightroom presets, click here to get our FREE Lightroom Starter Kit that has them included!
In addition to the lightroom presets, you'll also get a step by step guide to importing your photos into Lightroom, an editing checklist (so you know what to do and when to do it) and a export cheat sheet.
This post will show you how to:
Install Lightroom Presets (including the 4 free ones you are getting from me!)
Apply a Lightroom Preset
Tweak a Lightroom Preset to get it to look the way you want it to
Create your own time saving Lightroom Presets
Use the presets in both Lightroom Classic AND Lightroom CC.
Let’s dive in!
How To Easily Install Presets into Lightroom Classic
Although Lightroom does come pre-installed with some presets, they aren’t great (they are often VERY overdone) so for best results you might want to get your hands on some presets.
(I'm giving you 4 "one click" Lightroom presets along with my Lightroom Starter Kit, which I’ll send you, for free!Just click here to get them)
If you just want to use the presets that came with Lightroom, skip forward to the next section where I’ll show you how to use a preset.
But if you do want to install some presets, watch the video below to see how it’s done. (These show my Polished Preset System but the process is the same for all presets!)
I’ll show you at the bottom how you can install the same presets into Lightroom (i.e the other version of Lightroom) too!
How to Use A Lightroom Preset
Using a Lightroom preset couldn't be easier, and you would probably be able to figure this out yourself, but hey, this is the Ultimate Guide to Presets so I'm not leaving anything out 😄
Head into the Develop Module, and go the panel on the right hand side, called the Navigator Panel. Here you will see a section for Presets.
Click on the triangle on the left of the presets panel to open it up if it's not already open.
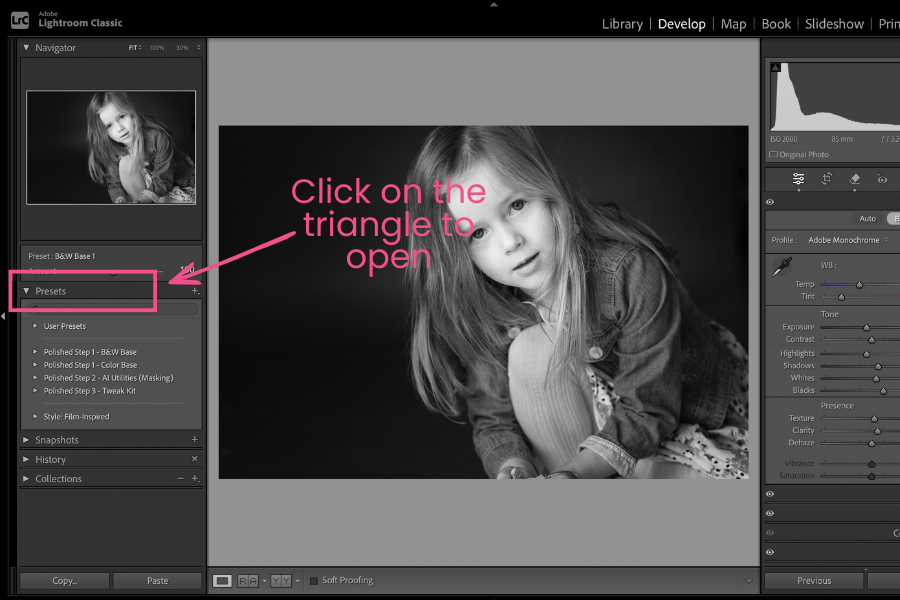
Lightroom Classic comes with some presets already built in, so you have something to play with to help get you started, or this is where you will see your installed presets.
Either way, when you open that preset panel you'll see some Preset Folders, and again, just click on the little triangle on the left to open up any particular folder and inside you will see the individual presets within that folder.
In the screenshots below I’m showing you my Polished Preset System but this works the same for all presets.
Simply make sure you have the image you want to edit selected so that it is showing in the panel in the middle, and then click on any one of the presets that takes your fancy.
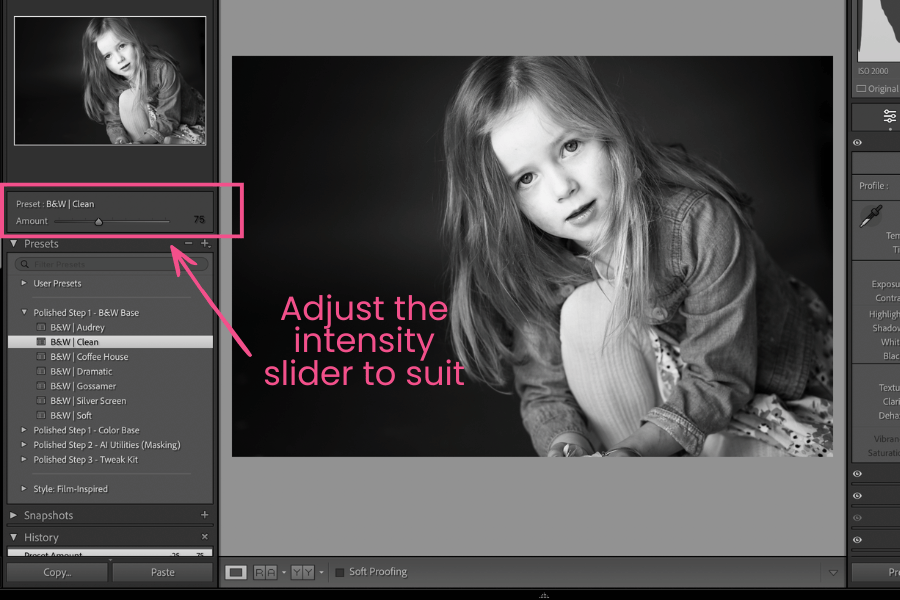
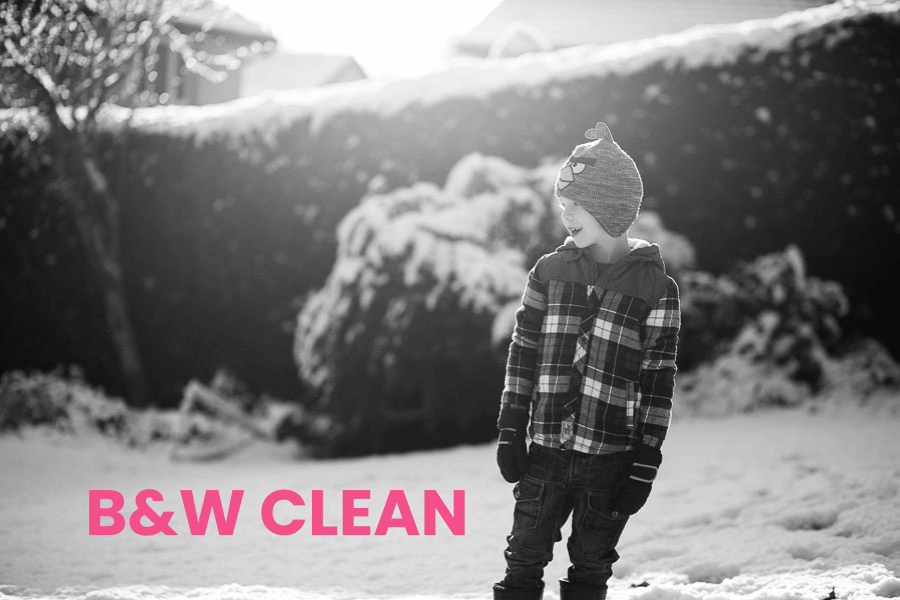
In this example, I've chosen B&W Clean as my editing “base”
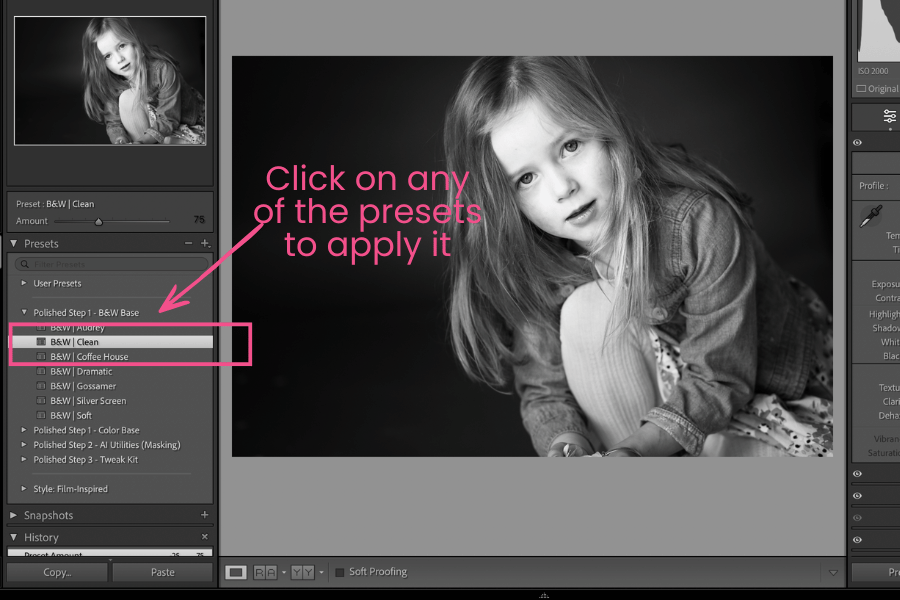
When you click on it, Lightroom will immediately make the necessary editing changes that are needed to apply this "look".
In this case, this preset gave me an instant black and white conversion which took around, ooh, let me see, three seconds 😉
That, my friends, is the beauty of Lightroom Presets in action!
In just a couple of seconds I've managed to do a pretty darn good B&W conversion, rather than the few minutes it would have taken by hand.
That's all you need to do to use a preset! Told you it was simple 😄
Of course, MOST presets aren’t great straight out of the gate, which is why we also need to tweak them, which is what will look at next.
PRO TIP: You don't even have to click to apply the preset to see the effect unless you want to! You can see a preview of the preset will look on your image on the small version of your image at the top of the Navigator Panel.

How to Tweak a Lightroom Preset
Although sometimes your image will look good right off the bat after applying a preset, most times, you will look at it and think it’s not as good as you would like it to be!
The first thing to note is not all presets will suit all images - that's just the way it goes.
That’s why it can help to have a range of different presets that will give you a variety of looks.
So before you do anything, have a flick through other presets to see whether something else works better for that particular image.
However, the preset you have chosen might work perfectly well if you just made a couple of small tweaks.
So, if you think, "that's good but I wish..." then chances are you can tweak it to your liking.
For most presets, including the ones in my Polished Preset System, you can adjust the intensity of the preset just by moving the intensity slider:
Now, this is a great first step, but the chances are your preset will STILL not look fantastic at this point, and will need a teeny little bit more work.
That’s because a “one click” preset can only do so much - we need to make further adjustments to really make it shine!
First of all, you will probably also want to do some local adjustments on your image so that you can fine tune the overall look.
And second, you will probably want to head to some of the editing panels and make any final adjustments by hand - for example, brightening the exposure a little or reducing the contrast, adding in some split toning or noise reduction.
For many presets, I'm not going to lie, at this point, knowing how to edit within Lightroom becomes a real advantage because you have a much better idea of what you need to do to make your image shine!
However, if you have my Polished Preset System, you don’t need to worry about that 🙌
That’s because the the Polished Preset System isn’t a bunch of one click presets - it’s actually a three step system that more closely follows how you would edit by hand.
So after applying the base preset you would then move onto Step 2 - the AI Utilities Kit.
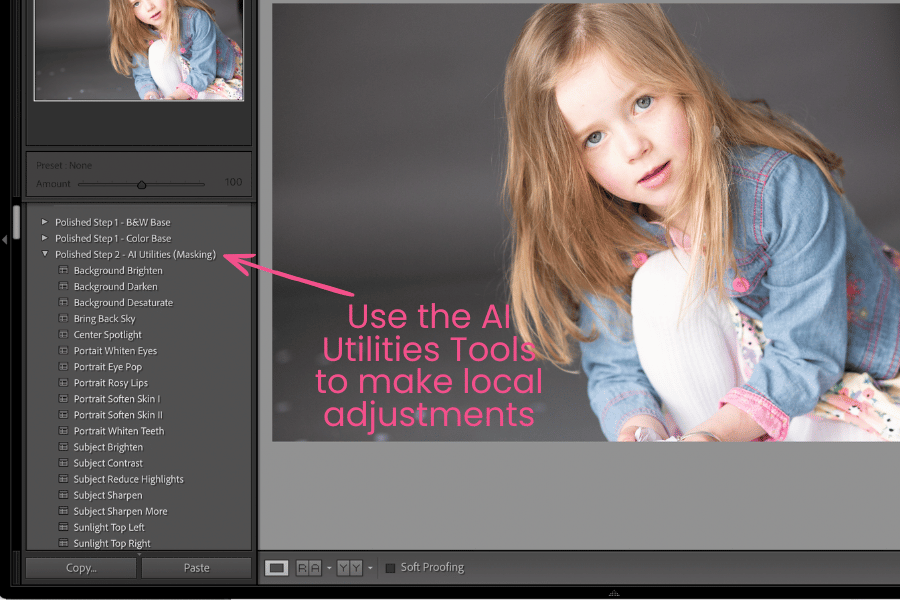
This allows you to quickly make local adjustments such as portrait enhancement, brightening your subject only, darkening the background and so on.
(These are SUCH a huge timesaver and have to be seen to be believed! You can see them in action here.Just scroll down on that page for the video)
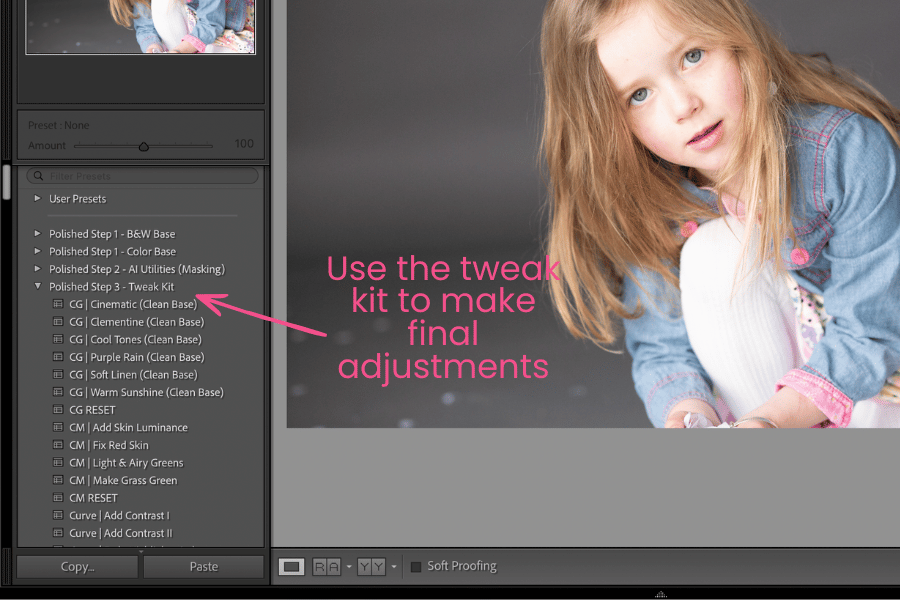
Next, you would move onto Step 3, which has that final tweaks, like adding more contrast, toning, sharpening, noise reduction, vignettes and so on.
Now, please be aware, you definitely don’t need the presets for this - you can do all these adjustments by hand - but having them all there for you makes it much easier, and helps you consider what you need to / could do next.
Pro Tip: Always try to use presets on images that have the white balance and the exposure correct. MOST one-click presets will leave these alone because they are unique to every image (some don't though - if they don’t, you should avoid those presets like the ‘rona virus)
How to Reset A Lightroom Classic Preset
If you really don't like what has happened to your image and just want to go back to your original, unedited image without the preset applied you can!
Just go to the bottom of the editing panels on the right hand side, and you will see a button called Reset.
Click that, and your image will go right back to the very beginning, as it was straight out of camera, no harm done.
How to Create Your Own Lightroom Classic Presets
If you have a set of editing steps that you go through time and time again, then consider making your OWN preset for them.
Even if you just really like the way a particular edit has turned out, you can make a preset for that too, so that you can apply it other images easily and see if you like the effect on them too!
Here's what to do:
First of all grab an unedited, straight out of camera image, and play around with the sliders in the Develop Module until you get a look you want.
Alternatively, just add in some basic adjustments that you do to most images, for example, adding contrast and vibrance.
You can make adjustments to ALL the panels, such as the Basic Panel, Tone Curve, Detail and Lens Corrections Panels, and the preset will save them all if that is what you want (you can choose which settings to save in the next step)
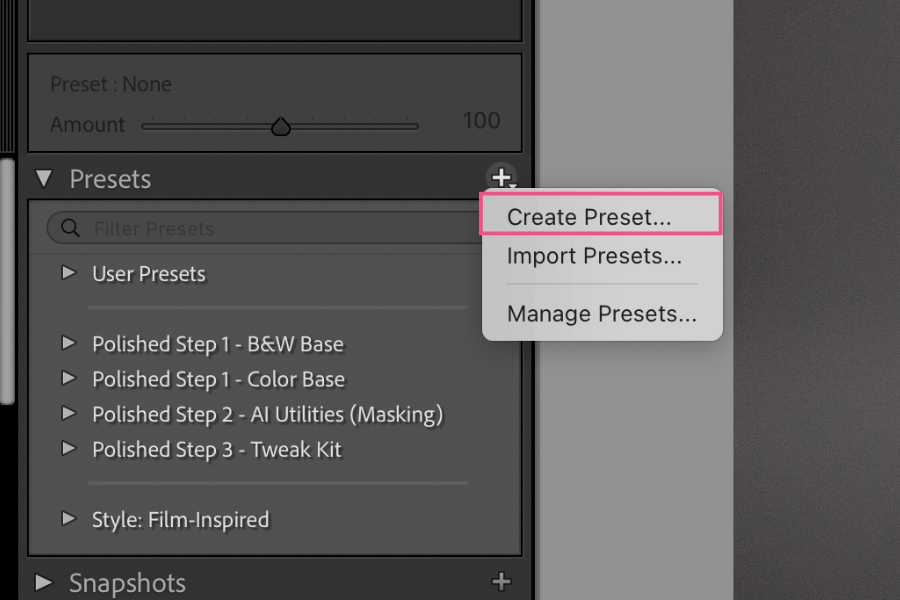
Once you have the sliders the way you want them, head over to the panel on the left hand side (the Navigator Panel) and find the Presets section again.
Just click on the + button you see at the right hand side, and then choose Create Preset.
A dialogue box called "New Develop Preset" will pop up.

This shows all the different setting options that could be saved as part of that preset. You can choose to not save some of the settings in your preset, just by unchecking the box next to them. For example you may wish to uncheck white balance and exposure so that these are not saved as part of the preset. (That's what I have done in the example below)
Type in a name for your preset so you know what it is - be descriptive so you can find it again and know what it does.
You can also select which folder in your presets to save this to - unless you want to save them somewhere else simply choose User Presets. Click Create when you're ready.
Congratulations, you have just made your first user preset!!
You can then find it your it in the Navigator Panel, in Presets, in the User Presets Folder.
You can now use this just like any other preset!
How to use the same presets in Lightroom
You can also use the same presets in Lightroom too!
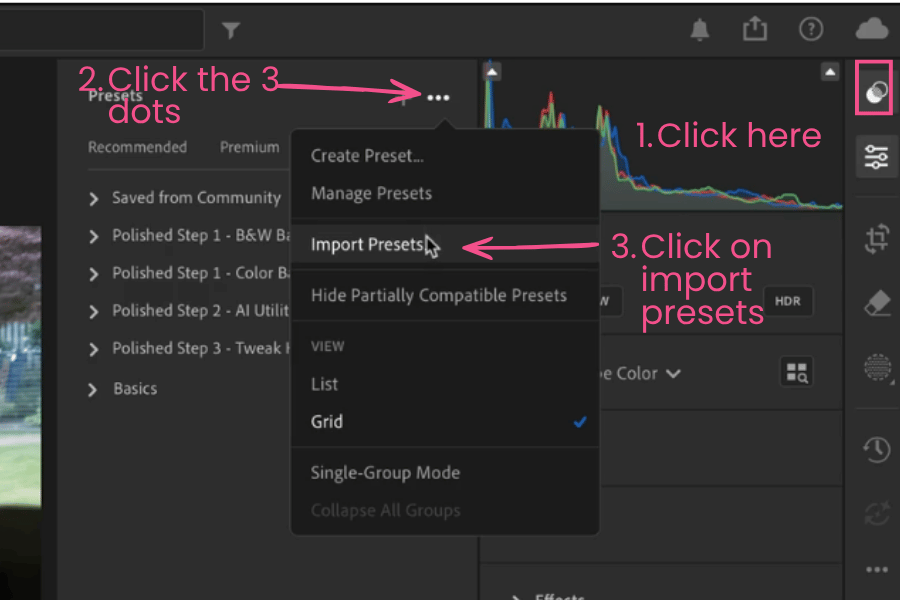
Install these by clicking on the preset icon on the top right, and then clicking on the three dots to the right of the preset panel that opened up.
Then, click on Import Presets.
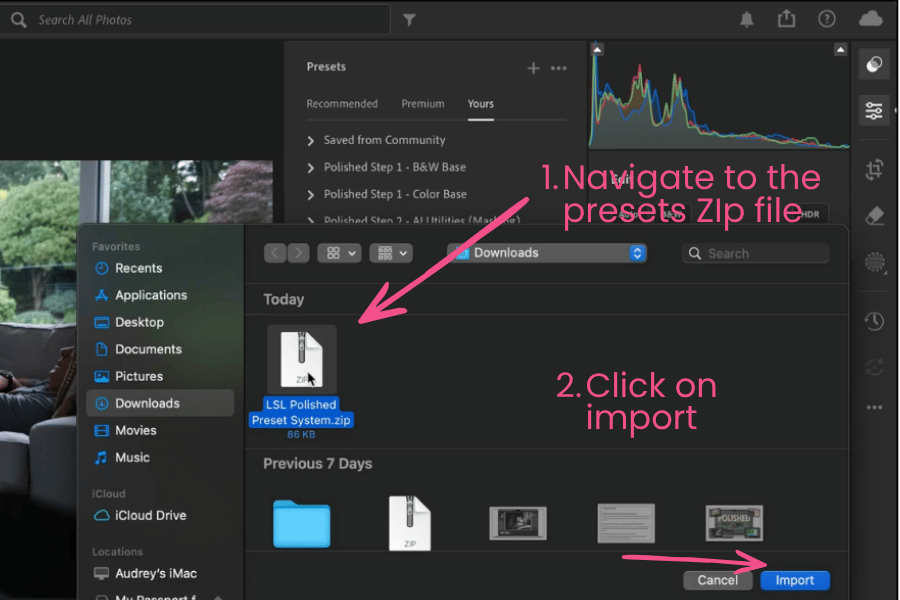
Then, navigate to where you saved your preset zip file, select it, then click on import.
Eh, voila, your presets are installed and ready to use!
Ready to take action?
Why not spend a little time practising with presets?
Download the four "go-to" presets for FREE - you get them inside my Lightroom Starter Kit (also free!) where you’lll also get a step by step guide to importing your photos into Lightroom, an editing checklist (so you know what to do and when to do it) and a export cheat sheet.
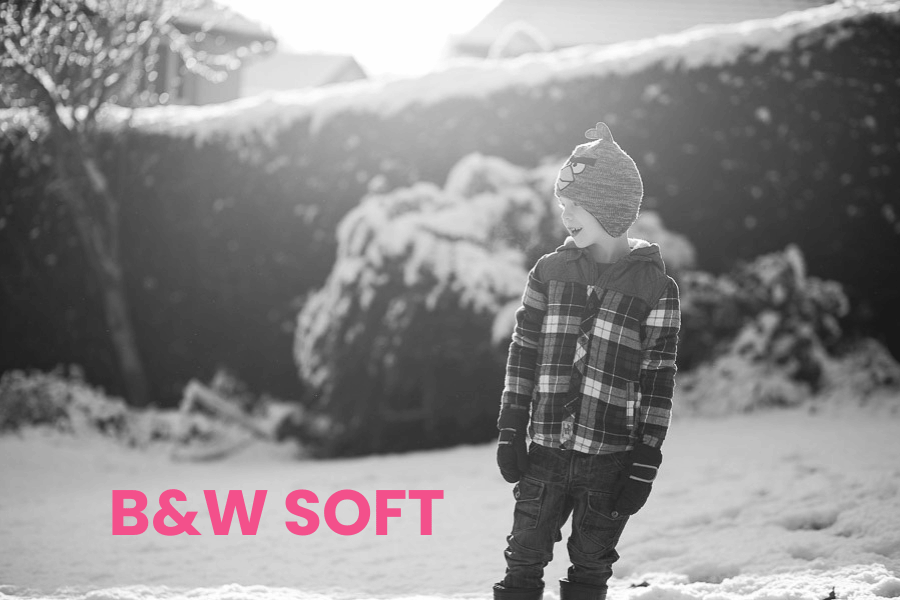
Here's the four presets you can download and what they look like on the first SOOC (straight out of camera) image.


I hope you found this tutorial on Lightroom Presets helpful, and you can see how these can save you time editing.
If you like the idea of having a system to follow for editing, rather than a bunch of random one click presets, do make sure that you check out the Polished Preset System too!
Inside you’ll get two sets of base presets (one for colour images and one for black and white) our time saving AI utilities presets and our revolutionary tweak kit so that you can edit your images to polished perfection in seconds.