
A Step By Step Guide To Indoor Portrait Photography
In this guide to indoor portrait photography, I’m going to teach you exactly how to take portrait photos indoors, so you can get beautiful, natural images of people in your home, or any other indoor location!
The good news is, taking an indoor portrait can often be much easier than outdoors, because you don’t have to worry about hotspots, or finding open shade, or having flat boring light.
Indoor light is also much easier to control, and with just one window, you have so many options! In fact, many of our Mastering Natural Light students are amazed at how great their indoor portraits can look!
So let’s get cracking on everything you need to know for to get a great indoor portrait!

What do you need for indoor portraits?
The best part about shooting indoors is that the ONLY lighting equipment you need is a window!
Window light is simply incredible, and in most homes, you’ll have several options available to you, as practically every room will have one! So you can’t say you don’t have the right equipment 😉
I really want to stress here that you can sometimes find the best light in the most unlikely places.
Check out your bathroom, kitchen or hallways - all of these places can have great light, so if you can work in that room, then go for it!
(My bathroom has the most amazing light, so if I were taking just a portrait headshot, I can get away with using it!)
Usually finding a window bigger than your subject is the best bet, as this will give you lovely soft light on your subject, although don’t discount smaller windows too. You will have to move your subject closer to it, but they can still give fantastic light too, especially for headshots.
One other thing to be aware of is that we generally don’t want light shining in through the window, as that won’t be super flattering to your subject.
This image below was taken in my living room, which has a HUGE window, so it’s perfect for soft flattering light!

If you want to learn more about using natural light, be sure to download our FREE mastering natural light starter guide. You'll learn all about the building blocks of light - its colour, intensity and direction - along with some ideas for using each one to kickstart your creative juices. Plus you'll get the questions you should ask yourself about the light when shooting, so you can put it all into action! Go here to download it.
Do you need flash for indoor photography?
It’s definitely, 100% possible to take an indoor portrait without flash - in fact - the window is the best softbox you can get!
However, some photographers do like to “supplement” the natural light by using an on-camera flash unit.
If you do decide to use flash, be sure to bounce it from the direction of the natural light to keep it natural looking and flattering to your subject, OR you can use it to fill in the shadows on the side of the face farthest from the window.
If you are doing this, just be careful that you don’t get rid of all of the shadows on your subject, as shadows help give your subject’s depth and dimension.
Try to find the right balance between lightening the shadows, but keeping enough of the shadow there to maintain the shape of the subject and three-dimensional quality that shadows give you.
Consider a reflector instead!
If you’re planning on using a flash to fill in shadows, why not consider a reflector instead?
A reflector bounces light back onto your subject, “filling in” unwanted shadows, and is a much cheaper and easier way to do it!
Just keep in mind those tips for using a flash - don’t brighten it up to an extend that you lose ALL the shadows.

Not got great windows? Use your front door!
If you are struggling to find somewhere that has great light, but don’t want to use a flash, then look no further than your front door!
It’s always larger than your subject, so you are pretty much guaranteed to get great light for your indoor portrait there!
And as a side note, garages make for fantastic light too - in fact, that’s what I’ve previously used as my natural light studio (before my husband reclaimed it and stuffed it so full of motorbikes that I can’t get in 😡)
This portrait image below was taken using garage light:

Can I use lamp light to supplement the natural light instead of flash?
Often I hear people say they don’t have enough light when shooting indoor, so they try to add MORE light by using lamps or overhead lights, to supplement the natural light coming from the window.
Don’t do this!
When you have both natural and artificial light, you are mixing up the light temperatures, so you will find you have mixed white balances in one image. If both types of light are falling on your subject, it’s pretty much impossible to fix even in post processing.
(Plus the direction of light from some of these sources, particularly overhead lights, is pretty bad and won’t give you the best results!)
So stick to just ONE light source, and turn off all lamps or overhead lights in the room you are shooting in.
But don’t stop there! Turn off lights from other rooms that may have light spilling in the room you are in. For example, in my living room I have glass doors, so I have to shut off any lights in my hallway and kitchen too.
(By the way, if you want to shoot with just lamp light - go for it! You can get amazing images with artificial light sources too. The key is simply not to mix them with natural light sources)
Lighting For Indoor Portrait Photography
With your subject positioned near to a window, or the front door, you then should experiment with your subject’s position with regard to the light, in order to get a variety of pictures in one location.
You can use front light, side light, or backlight - or even go for a silhouette!
You can try different photography lighting patterns with windows too, so don’t think that you need studio equipment to get loads of different looks - your one window will do just fine :)
You can also vary the look of the light by closing blinds or filtering the light to give you a different mood or feel to your indoor portrait.
This image is taken with just a patio door for light, and the subject positioned at a 45 degree angle to get some soft shadowing on the face.
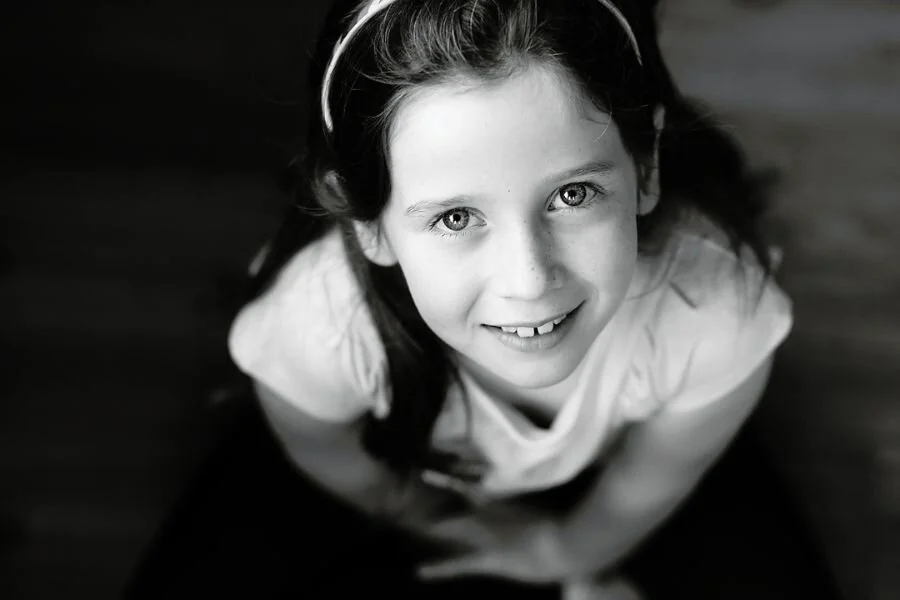
One quick tip about portrait photography lighting (and this is true whether you shoot indoor or outdoor) look to the eyes and make sure that they have catchlights.
Catchlights is simply the photography term given to the light reflected in the eyes. This is the place where the eyeball “catches” the light! You can see them on the left hand side of her eyes in the image above.
Position your subject so that the light is “catching” the eyes to bring your portrait to life!
How to get a “studio” look at home
The only problem you might experience when shooting an indoor portrait is the background!
Usually a home will have a busy background - pictures on the wall, plants, ornaments etc, which can be distracting.
If it is drawing the eye away from your subject, then simply move these out of the way so that you get a more pleasing background.
I also hunt around for blank walls near a window (or where I can easily create a blank wall just by moving a picture) so I have a ready made photo studio.
(You can also easily set up a backdrop if you have a large enough room, and can’t find a blank wall)

However, I like to mix it up with regard to my backgrounds - I take some with the background intact for a more environmental portrait, and some with a blank wall to get that ‘studio” look.
This really does depend on the type of portrait photography you do - for some people, particularly if the environments “says” something about the subject, you might want to only take images with some of the background included!
What lens should I use for an indoor portrait?
For an indoor portrait, I tend to use an 85mm lens - it’s a perfect focal length for portrait photography as it slims down the face just a tad (or at least, certainly doesn’t widen it!) but it’s not so long that I need to backed up into another room!
A 50mm is another great option if you don’t have an 85mm.
If you want to fit more into the frame for an environmental portrait, then a 35mm might also be useful, but don’t get too close with it or you’ll get distortion.
What settings should I use for indoor photography?
You are going to want to use a wider aperture in order to maximise the amount of light reaching the sensor, but remember that you will definitely want to get both eyes in focus in your portrait.
Be sure to keep the aperture small enough to get everything you want in focus!
You will also probably a higher ISO number when shooting indoor. I will typically find myself shooting with an ISO of around 800 or higher.
If you have a stationary subject, a tripod might be an idea to help you use a lower shutter speed than you feel comfortable using handheld. I personally stick to somewhere between 1/100 and 1/250 when photographing people.
If you want a little more information on the best settings for indoor photos, be sure to watch this!
Do also make sure that you use manual mode - this is going to help you get the aperture right so you get everything you want in focus, the right shutter speed so you don’t get motion blur, and the right ISO so you don’t get grain!
(You can also read this guide on how to stop getting grain in your photos)
Finally, don’t forget to download our FREE mastering natural light guide for even more information about using natural light to take beautiful images both indoors and out! Learning about light is KEY in photography, so go here to download it or click on the graphic below and enter your details there!
Learning how to find and look for the light indoor open up a whole new photography world for you, because it means you can take a portrait whatever the time of year, and whatever the weather (and if you are just starting out, learn how to use light indoors FIRST - it’s much easier to control than outdoor light!)
I hope you enjoyed these tips for indoor portrait photography - and if you have any you’d like to share, I’d love to hear from you! Just leave your thoughts in the comments below.
SOME OTHER POSTS YOU MIGHT LIKE!
Photography Lighting Ideas for More Creative Photos
How to Get Catchlights in Photography with Natural Light
Why are my photos grainy (and how to fix it!)
Indoor Photography Settings & Tips
Must Use Camera Settings For Portrait Photography