How to Get Catchlights in Photography (with Natural Light)
Catchlights are SO important in photography, as they add life and depth to the eyes in your portraits.
Eyes that look full of life and that sparkle are those that have catchlights in them, so for successful portraits, you’re definitely going to want to get catchlights in the eyes!
You can get catchlights in all sorts of lighting situations, from window light, to sunny days to studio lighting, but for today’s tutorial, I’m going to stick to using wonderful natural light, and how you can get catchlights in your portraits, both indoors and out.
Now, before we dive in, I wanted to let you know about an extra special freebie I’ve created just for you! It’s my FREE 90 Day Photography Learning Blueprint, and it’s a complete roadmap for you to follow that shows you exactly what you need learn to get great photos, and has links to further reading in each one. This little PDF is worth its weight in gold, so go grab it now (you’ll kick yourself in about a week if you don’t!)
What are Catchlights in Photography?
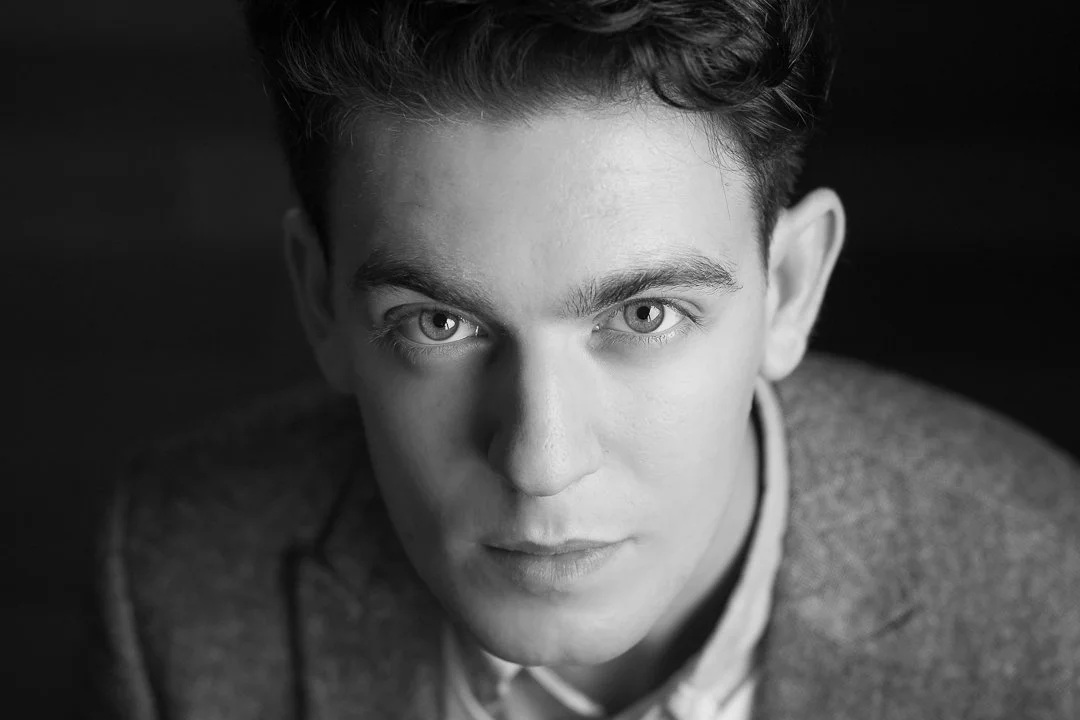
Catchlights is simply the term given to the light reflected in the eyes - literally where the eyeball catches the light! (You’ll see this marked in the image below!)
They help make the eyes “pop” in your portraits, and give life to the eyes, so they’re really important to get when taking images of people, or even pets, otherwise the image tends to look flat.
Catchlights come in all sorts of shapes and sizes, as they are reflecting the light source which can change from portrait to portrait. For example, a large open sky will product a larger catchlight than the one from a small window, which will again be different from the catchlight produced by a studio light.
How do I create catchlights indoors?
The easiest way to start with catchlights is to try indoors to begin with. It’s just easier to control your kids and shepherd them into the right location indoors first, plus you are more in control of the positioning and type of light.
Plus window light is PHENOMENAL for producing wonderful catchlights!
For catchlights indoors, you want to position your subject close to the window, or even an open doorway, so that the light can reach their eyes. The closer your subject is to the light source, the larger the catchlights you’ll get.
You then want to have them turn and face the window at about a 45 degree angle - this will help you get the catchlights in an ideal position, plus add some depth and dimension to the face. (the ideal position for a catchlight is at 10 or 2 ‘o’ clock, and not over the pupil, but if you can’t get this, that’s fine, just do your best!)
Here’s a pretty good example of window light, where the subject is at about 45 degree angle to the window - the catchlights are pretty much on 2 o clock too.
How do I create catchlights outdoors?
Of course, you can create catchlights outdoors too! You are more at the mercy of Mother Nature here, but it’s possible to get catchlights in ALL types of weather.
Let’s start by looking at sunny days.
The easiest way to get catchlights outdoors on sunny days is to find what is known as open shade.
Open shade is anywhere that is shaded from direct sunlight but still has ambient light around it. Examples of open shade would be the shade produced by an umbrella, at the edge of a forested area, under the shade of an awning, or the shade caused by a building.
You’ll place your subject at the edge of the shaded area, looking out onto the light source, like in the diagram below (this bit is important - you don’t want them looking back into the shadow unless you have some form of reflector there)
So they are looking out ONTO the light, but not actually IN the light. You can learn more about open shade in photography here!
Here’s an example of an image taken in open shade - the subject is juuuuuust out of the light, in a porch, but most importantly, looking out into the lit area. You’ll see that the eyes are full of light!
So what about days that are NOT sunny?
Well, If the day is overcast, you can actually struggle to get catchlights in the eyes, in which case, simply place your subject below you, and have your subject look up toward you so that the open sky reflects back into their eyes.
The final type of light I want to mention is golden hour - that hour of magical light that happens just before sunset or just after sunrise.
This hour is coveted by photographers due to the fact that the sun is soft and low in the sky, giving you yummy light to work with. It’s such a wonderful time to shoot, but for me it’s not an ideal shooting time due to the fact that I capture more lifestyle shots of my own family, and we aren’t often out and about at sunrise or sunset! But for special photos, I would absolutely make the time to shoot at the golden hour. Anyway, I digress…
At this time, you can have your subject out in the sun, and even looking toward the light - something that you can’t do when the sun is higher in the sky, or you’ll get squinty eyes (in your subject, not on you!)
Over to you! Experiment with Catchlights
Remember, catchlights in the eyes are key to having portraits where your subject looks alive, which is a pretty darn good reason to make sure that your subjects always have a catchlight in their eye.
The biggest helper you can have in finding the light is simply to watch the light and where it is hitting your subject. If you are struggling (and you have a willing subject!!) have them move around in the a circle and watch the eyes as you can see how the light is hitting them.
The good news is, not only does finding the best light for catchlights help you get beautiful eyes in your portraits, it will help with other things as well, such as great exposure, less harsh shadows, better skin tones and no hot spots!
You can also take catchlights in the eyes to the next level by enhancing the eyes in post-production, which will really help give the eyes that WOW factor that you want in a portrait image.
Don’t forget to download your FREE 90 Day Photography Learning Blueprint before you go too: there is so much goodness in this little PDF that you’ll definitely want this with you on your photography journey. Grab it here:


