
How to Work Out Your Depth of Field
To get tack sharp images, one element you need to be aware of is your Aperture. Aperture controls the depth of field - in other words, how much of your scene is going to be in focus. A smaller F number means you will have a smaller depth of field (less in focus) and a bigger F number means more will be in focus.

I have been asked many times about which aperture you should use for what, and whilst I always try to give guidance on that (I never like to duck a question if I can help it!) the truth is that it very depends on the camera model you have, the lens you are using, how far away you are from the subject and the distance between yourself and what you are trying to get in focus.
I know - thats one helluva lot of variables!
The good news is you can actually use a calculator to find out exactly what aperture you need! And here's how you do it.
STEP ONE: OPEN THE DEPTH OF FIELD CALCULATOR
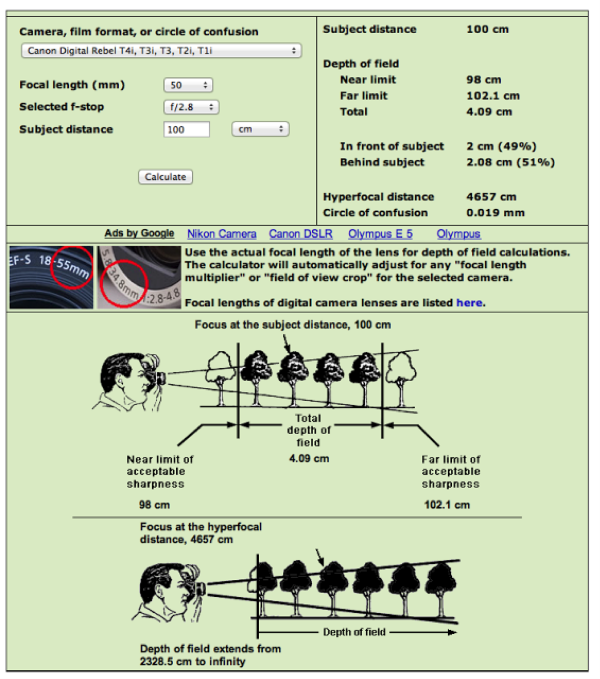
Open the DOF Calcuator and choose your camera model from the drop down list, add in the focal length of the lens you are using, an example F stop, how far you are away from your subject.
In my example here, I'm saying I have a Canon T3I, and I'm using a 50mm lens, with an F stop of F2.8 and I'm about 100cm (1 Metre) away from my subject - so pretty close.
STEP TWO: LOOK AT THE "TOTAL", "IN FRONT OF SUBJECT", AND "BEHIND SUBJECT" NUMBERS
The calculator tells me exactly how much of my scene is going to be in focus. You are looking at three things - the "Total", "In front of Subject" and "Behind Subject" numbers. You can ignore the rest for what we are using the calculator for today! (Did I just hear you mutter "thank god for that"?!)
"Total" shows me just how much of the scene will be in focus - with an F Stop of F2.8 only a total of around 4cm will be in focus. That's quite a small area!
Of that 4 cm, 2cm in front of where I put my focal point, and 2cm behind my focal point will be in focus. To put that into perspective, let's just say I'm taking a portrait style shot - if I have my subject face me square on with both eyes facing me, then this aperture is fine. HOWEVER, if my subject is at an angle, where they have one eye closer to the camera to the other, then this is not enough! If I focus on the eye nearest the camera, then anything more than 2cm behind from it will be OUT of focus - in many cases the second eye.
STEP THREE - PLAY!
This is where your depth of field calculator can come in handy - you can play about with different aperture numbers until you get a number you are comfortable achieving! If I increase my F number to F4.5, you can see that the area that will be in focus increases to over 6cm with over 3cm of that behind. So, in this case, that should probably do it.

Now, I know that you are not going to whip out a DOF calculator every time you want to take a photo, and neither do I. But what you can do is use it to get some idea of what aperture you need to be using in different situations. Eventually, experience will tell you what aperture you need to use, but for now, have a play with the calculator and see how the various elements change your depth of field - it's one of the best ways to see how all the different elements (distance, lens, aperture, camera) come together for depth of field - all from the comfort of your couch :)
If you would like some ideas of which aperture, shutter speed and ISO settings to use in general, be sure to grab your copy of my manual mode cheat sheet. It’s 100% free, so go here to download it!